
HTV Placement Guide: Where to Put a Design on a Shirt
A great design in the wrong spot still looks homemade. Most placement problems come down to two things: the design sits too low, or it's a little off center. Here's where each design goes, how far from the collar, and a quick way to line it up every time.
By the CraftSizer team · Updated 2026-10-18
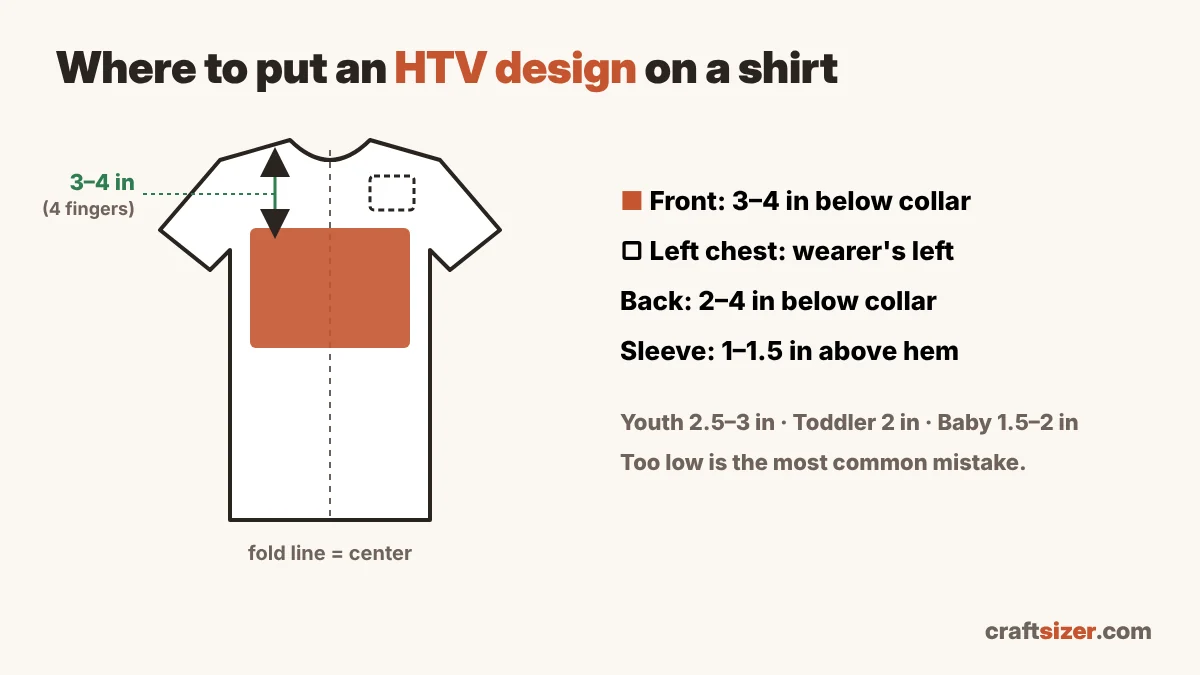
The most common mistake: too low
When a shirt is lying flat, the middle of the shirt looks like the right place for a front design. It isn't. Once the shirt is on, that spot sits at the stomach. A front design should start just a few inches below the collar, so it lands on the chest.
Measure from the bottom of the collar seam to the top of the design:
| Shirt | Front design: below the collar | Finger guide |
|---|---|---|
| Adult | 3–4 in | about 4 fingers |
| Youth | 2.5–3 in | about 3 fingers |
| Toddler | about 2 in | about 2 fingers |
| Baby bodysuit | 1.5–2 in | about 2 fingers |
Common starting points. V-necks and wide necklines may need the design a little lower.
Placement by location
Full front
Centered left to right, top of the design at the distance above. Adult designs are usually 9–11 inches wide; youth 7–9; toddler 5–7. Use the HTV shirt design size calculator to get the height that matches your design's shape.
Left chest (pocket)
On the wearer's left, which is on your right when the shirt faces you. On an adult shirt, place it about 3–4 inches below the collar seam and about 4 inches from the center line. A simple check: the design should sit roughly where a pocket would be, between the center and the armpit seam.
Full back
Centered, with the top of the design about 2–4 inches below the back collar on adult shirts. Back designs can be a bit larger than front ones, about 10–12 inches wide.
Back neck (yoke)
Small logos or names sit about 1–2 inches below the back collar, centered. Keep them about 3–5 inches wide on adult shirts.
Sleeve
Centered on the outside of the sleeve, about 1–1.5 inches above the hem on short sleeves. Short-sleeve designs are usually 2.5–3.5 inches wide. On hoodies and long sleeves, tall vertical designs down the forearm work well.
Baby bodysuits
Bodysuits are short, so front designs are small (about 4–5 inches wide) and close to the neckline. Use a pressing pillow or a folded towel inside so the snaps and seams don't cause uneven pressure.
The fold method for a perfectly centered design
- Fold the shirt in half lengthwise, sleeves together, and press for 2–3 seconds to make a light crease down the center.
- Fold the HTV carrier sheet in half the same way, so you can see its center line.
- Line up the two creases, then measure down from the collar using the table above.
- Tack the design in place with a quick 2–3 second press before the full press, so it can't shift.
A T-shirt ruler makes this faster, but the fold method needs nothing extra and works on any size.
Before you press: a quick checklist
- Mirror the design before cutting HTV, shiny carrier side down on the mat.
- Pre-press the shirt for a few seconds to remove moisture and wrinkles.
- Lay the cut design on the shirt and look at it from a few steps back. Charts are a guide; your eye is the final check, especially on oversized or fitted tees.
- For printed transfers (DTF or sublimation), check the file is sharp enough for the size with the DPI checker.
Frequently asked questions
How far down from the collar should I put an HTV design?
On adult shirts, the top of a front design usually sits about 3–4 inches below the collar seam. Youth shirts are about 2.5–3 inches, toddlers about 2 inches, and baby bodysuits about 1.5–2 inches.
Which side is the left chest on a shirt?
It's the wearer's left side, which is on your right when the shirt is facing you.
How do I center a design on a shirt?
Fold the shirt in half lengthwise and press lightly to make a crease, fold the carrier sheet the same way, and line up the two creases.